Discover the step-by-step process to build a golf simulator on a budget. From selecting the right components and setting up the equipment to enhancing your experience with , we’ve got you covered.
Components Needed for a Budget Golf Simulator
Are you a golf enthusiast looking to practice your swing from the comfort of your own home? Building a budget golf simulator can be a great way to improve your game without breaking the bank. In this section, we will discuss the essential components you will need to create your very own budget-friendly golf simulator.
Golf Net
The first component you will need for your golf simulator is a high-quality golf net. This is where you will be hitting your golf balls into, so it is crucial to choose a net that is durable and can handle the impact of your shots. Look for a net that is made from strong materials, such as nylon or polyester, and has a sturdy frame to keep it in place during your practice sessions.
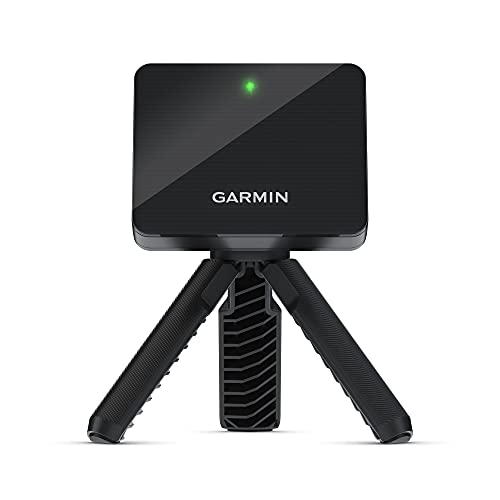
Launch Monitor
A launch monitor is an essential tool for any golf simulator . It measures various aspects of your swing, such as clubhead speed, ball speed, and launch angle, providing you with valuable data to analyze and improve your performance. When choosing a launch monitor, consider factors such as accuracy, ease of use, and compatibility with your simulator software.
Projector
To create a realistic golfing experience, you will need a projector to display the virtual golf course onto a screen or impact screen. When selecting a projector, look for one that offers high resolution and brightness to ensure clear and vibrant visuals. Consider the throw distance, which is the distance between the projector and the screen, to determine the size and placement of your screen.

Impact Screen
The impact screen is what you will be hitting the golf balls into, so it is essential to choose a durable and high-quality screen. Look for a screen that can withstand the impact of your shots without tearing or stretching. There are various materials available, such as polyester or vinyl, that offer different levels of durability and image clarity. Consider the size of the screen and the space you have available for installation.
Simulator Software
The final component you will need for your budget golf simulator is the simulator software. This software allows you to play virtual golf courses and provides you with realistic feedback on your shots. When choosing simulator software, consider factors such as the variety of courses available, the accuracy of ball flight physics, and the user interface. Look for software that is compatible with your launch monitor and projector for a seamless integration.
In summary, to build a budget golf simulator, you will need a golf net, launch monitor, projector, impact screen, and simulator software. These components work together to create a realistic golfing experience in the comfort of your own home. Take the time to research and choose high-quality products that fit within your budget. Now that you have a better understanding of the essential components, let’s move on to the next section to learn about choosing the right space for your golf simulator .
Choosing the Right Space for Your Golf Simulator
When it comes to setting up a golf simulator in your home, one of the most important factors to consider is choosing the right space. The right space can greatly enhance your golfing experience and ensure that you have enough room to swing your club without any restrictions. In this section, we will discuss the key considerations for selecting the perfect space for your golf simulator.

Room Size and Dimensions
The first thing you need to consider when choosing the space for your golf simulator is the size and dimensions of the room. Ideally, you want a room that is large enough to comfortably swing a golf club without feeling cramped. The minimum recommended room size for a golf simulator is around 10 feet wide, 12 feet long, and 8 feet high. However, if you have the luxury of a larger room, it will provide you with more freedom of movement and a more immersive experience.
To determine the ideal room size, consider the length of your golf club and the space required for your swing. You should have enough room to swing your club without hitting any walls or furniture. Additionally, you need to consider the space needed for other components of the golf simulator, such as the projector and launch monitor.
Ceiling Height
Another crucial factor to consider when choosing the space for your golf simulator is the ceiling height. The ceiling should be high enough to accommodate your swing, particularly if you are a taller golfer. A minimum ceiling height of 8 feet is recommended to ensure that you have enough clearance for your swing. However, if you have the option, a higher ceiling is preferable as it will provide a more open and spacious feel.
Keep in mind that the height of your ceiling can also impact the position of your projector. If the ceiling is too low, you may need to mount the projector at an angle or use a short-throw projector to ensure that the image is displayed properly.
Flooring Options
The type of flooring in your golf simulator room can greatly impact your overall experience. It is essential to choose a flooring option that provides the right balance of comfort, stability, and durability.

Carpeting is a popular choice for golf simulator rooms as it provides a soft and cushioned surface. This can be beneficial for your feet and joints, especially during long practice sessions. However, it is important to choose a low-pile carpet to ensure that your golf club does not get caught or snagged during your swing.
Another option is to use synthetic turf specifically designed for golf simulators. This type of flooring mimics the feel of a real golf course and provides excellent traction for your swing. It is also easy to clean and maintain, making it a convenient choice for many golfers.
For those who prefer a more versatile and multi-purpose space, hardwood or vinyl flooring can be a suitable option. These types of flooring are durable and easy to clean, making them ideal for a golf simulator room that doubles as a recreational area or home gym.
Lighting Considerations
Proper lighting is crucial for creating an optimal golf simulator environment. The right lighting can enhance visibility, improve accuracy, and create a more immersive experience. When choosing lighting for your golf simulator room, consider the following factors:
- Natural light: If possible, choose a room with windows or skylights that allow natural light to enter the space. Natural light can provide a more realistic and enjoyable golfing experience. However, it is essential to have window coverings or blinds to control the amount of light entering the room, as excessive light can interfere with the projection.
- Overhead lighting: Install overhead lighting fixtures that provide even and consistent lighting throughout the room. Avoid harsh or glaring lights that can create shadows or reflections on the screen. LED lights are a popular choice as they are energy-efficient, long-lasting, and offer adjustable brightness levels.
- Task lighting: Consider adding task lighting near the hitting area to ensure good visibility of your swing and the impact screen. Adjustable floor lamps or spotlights can be positioned to provide focused lighting on the hitting area, making it easier to see your swing and track the flight of the ball.
Building a DIY Golf Simulator Frame
When it comes to building your own golf simulator, one of the most crucial steps is constructing the frame. The frame serves as the foundation for the entire , providing support for the net and impact screen. In this section, we will guide you through the process of building a DIY golf simulator frame, covering everything from selecting the right materials to attaching the net and impact screen.
Selecting the Right Materials
Before you start building the frame, it’s important to choose the right materials. The materials you select will determine the strength and durability of your golf simulator. Here are a few options to consider:
- PVC pipe: PVC pipe is a popular choice for building a golf simulator frame due to its affordability and ease of use. It is lightweight, yet sturdy enough to support the net and impact screen.
- Metal tubing: If you’re looking for a more robust and professional-grade frame, metal tubing is an excellent option. It offers greater stability and can withstand the impact of golf shots. However, keep in mind that metal tubing might be more expensive and require more advanced tools for cutting and assembling.
- Wood: Wood can also be used to build a golf simulator frame, especially if you prefer a more traditional look. However, it may require more maintenance and is generally not as durable as PVC or metal.
When selecting the materials, consider your budget, the intended location of the simulator, and your personal preferences. PVC pipe is a popular choice for beginners due to its affordability and ease of use, while metal tubing is favored by more experienced DIY enthusiasts.
Measuring and Cutting
Once you have decided on the materials, it’s time to measure and cut them to the appropriate lengths. This step is crucial to ensure that the frame fits together correctly and provides adequate support. Here’s a step-by-step guide:
- Measure the dimensions of your intended golf simulator space. Consider the height, width, and depth of the area where the frame will be placed.
- Based on the measurements, determine the lengths of the PVC pipe, metal tubing, or wood pieces that you will need for the frame. Make sure to account for any additional length required for connectors or joints.
- Use a measuring tape or ruler to mark the appropriate lengths on your chosen material.
- Use a saw or pipe cutter to cut the material according to the marked measurements. Take your time and ensure that the cuts are clean and precise.
Assembling the Frame
With the materials cut to the correct lengths, it’s time to assemble the frame. This step involves connecting the different pieces together to create a sturdy structure. Here’s a simple guide to help you assemble your DIY golf simulator frame:
- Lay out all the cut pieces in the desired shape and configuration. Take a moment to visualize how the frame will come together.
- If you’re using PVC pipe, use PVC connectors and adhesive to join the pieces together. Make sure to follow the manufacturer’s instructions for applying the adhesive properly.
- If you’re using metal tubing, you can use connectors, brackets, or welding to secure the pieces together. Again, refer to the specific instructions for the chosen method.
- As you assemble the frame, periodically check for stability and make any necessary adjustments. It’s important to have a firm and secure structure to ensure safety during use.
Attaching the Net and Impact Screen
Once the frame is assembled, the final step is to attach the net and impact screen. This will create a functional golf simulator that can safely capture and contain golf shots. Here’s how to do it:

- Attach the net to the frame using zip ties or rope. Make sure the net is stretched tightly and securely fastened to prevent any sagging or movement.
- Install the impact screen on the side of the frame facing the hitting area. The screen should be positioned at a distance that allows for proper ball flight and visibility.
- Use hooks, clips, or Velcro straps to secure the impact screen to the frame. Ensure that it is tightly fastened to prevent any sagging or wrinkling that could affect the accuracy of your simulator.
By following these steps, you can build a DIY golf simulator frame that is sturdy, reliable, and tailored to your specific needs. Remember to choose the right materials, measure and cut with precision, assemble the frame securely, and attach the net and impact screen properly. With your frame complete, you’re one step closer to enjoying the convenience and excitement of practicing golf in the comfort of your own home.
Setting Up the Launch Monitor and Projector
Setting up the launch monitor and projector is a crucial step in creating a budget-friendly golf simulator that provides an immersive and realistic experience. In this section, we will discuss the proper positioning of the launch monitor, adjusting the projector placement, and calibrating the launch monitor for accurate readings.
Positioning the Launch Monitor
Positioning the launch monitor correctly is essential to ensure accurate data capture and analysis. The launch monitor is responsible for tracking various parameters such as clubhead speed, ball speed, launch angle, and spin rate. Here are some key considerations when positioning the launch monitor:
- Distance from the golfer: The launch monitor should be placed at a distance that allows it to capture accurate data without interfering with the golfer’s swing. Generally, a distance of 8-10 feet behind the hitting area is recommended. This distance allows the launch monitor to capture the ball flight and clubhead information effectively.
- Height and angle: The launch monitor should be positioned at a height that aligns with the golfer’s hitting point. It should be set up at an angle that allows it to capture the full ball flight. The launch monitor’s user manual or manufacturer’s guidelines can provide specific recommendations for the ideal height and angle.
- Stability: It is crucial to ensure the launch monitor is securely mounted or placed on a stable surface. Any movement or vibration can affect the accuracy of the readings. Using a tripod stand or a dedicated launch monitor stand can help maintain stability during the swing.
Adjusting the Projector Placement
To create a realistic and immersive golf simulator experience, the projector placement plays a vital role. Proper adjustment of the projector ensures that the golf course visuals are projected accurately onto the impact screen. Here are some essential steps for adjusting the projector placement:
- Distance and throw ratio: The distance between the projector and the impact screen is critical for achieving the desired image size and clarity. Refer to the projector’s user manual or specifications to determine the recommended distance and throw ratio. The throw ratio refers to the distance between the projector and the screen relative to the width of the projected image.
- Keystone correction: Keystone correction is a feature available in most projectors that helps correct image distortion caused by projecting at an angle. Adjust the keystone correction settings to ensure a rectangular and distortion-free image on the impact screen.
- Screen alignment: Once the projector is positioned at the correct distance, adjust the screen alignment using the projector’s lens shift or screen adjustments. This step ensures that the projected image is centered and aligned with the impact screen.
Calibrating the Launch Monitor
Calibrating the launch monitor is essential to ensure accurate readings and reliable data analysis. Each launch monitor model may have specific calibration procedures, so it’s crucial to refer to the user manual for detailed instructions. However, here are some general steps involved in calibrating a launch monitor:
- Check for firmware updates: Before calibrating, ensure that the launch monitor’s firmware is up to date. Manufacturers often release firmware updates that enhance performance and accuracy. Check the manufacturer’s website for any available updates and follow the instructions to install them if necessary.
- Environmental conditions: Ensure that the launch monitor is calibrated in consistent and controlled environmental conditions. Factors such as temperature, humidity, and lighting can affect the accuracy of the readings. Avoid direct sunlight or bright lights that may interfere with the launch monitor’s sensors.
- Calibration process: Follow the manufacturer’s instructions to calibrate the launch monitor. This typically involves hitting a series of shots with known values (e.g., distance, club used) to establish a baseline for accurate measurements. The launch monitor will compare the known values with the readings it captures to make adjustments if necessary.
- Verification: After calibrating the launch monitor, it is essential to verify its accuracy. Compare the launch monitor’s readings with known data or measurements to ensure consistency and reliability. This step helps build confidence in the launch monitor’s performance and ensures accurate data analysis during the golf simulator experience.
Creating a Budget-Friendly Impact Screen
When setting up your budget golf simulator, one crucial component you’ll need is an impact screen. The impact screen is what allows you to see your shots and provides a realistic golfing experience. In this section, we will explore the different aspects of creating a budget-friendly impact screen, including choosing the right material, building the frame, and installing the impact screen.
Choosing the Right Material
Selecting the appropriate material for your impact screen is essential to ensure durability and functionality. There are a few options to consider, each with its pros and cons.
- Baffle Netting: Baffle netting is a popular choice for budget-friendly impact screens. It is made of nylon or polyester and is designed to absorb the impact of the golf ball. Baffle netting is durable and can withstand high-velocity shots. However, it may not provide the same level of visual clarity as some other materials.
- Projector Screen Material: Another option is to use projector screen material as your impact screen. This material is specifically designed for high-definition projections and can offer excellent visibility. However, it may not be as durable as baffle netting and may require more frequent replacement.
- Canvas or Vinyl: Canvas or vinyl can be a cost-effective solution for creating an impact screen. These materials are sturdy and can handle the force of golf balls. However, they may not provide the same level of visual clarity as baffle netting or projector screen material.
Consider your budget, desired visual clarity, and durability when choosing the right material for your impact screen. It’s important to strike a balance between cost and performance to ensure a satisfying golfing experience.
Building the Frame
Once you’ve decided on the material for your impact screen, the next step is to build the frame that will hold it in place. Building a sturdy frame is crucial to maintain the integrity of the impact screen and ensure safety during use.
- Selecting the Right Materials: When building the frame, you’ll need to select the appropriate materials. PVC pipes are a popular choice due to their affordability and ease of assembly. You can find PVC pipes in various sizes at your local hardware store. Additionally, you’ll need connectors to join the pipes together securely.
- Measuring and Cutting: Begin by measuring the dimensions of your impact screen. This will help you determine the size of the frame you need to build. Use a saw or PVC pipe cutter to accurately cut the pipes to the desired lengths.
- Assembling the Frame: Once you have all the necessary materials and measurements, it’s time to assemble the frame. Connect the pipes using the appropriate connectors, ensuring a tight fit. It’s a good idea to use PVC cement to secure the connections and add extra stability to the frame.
Installing the Impact Screen
Now that you have your impact screen and frame ready, it’s time to install them in your golf simulator . Proper installation ensures that the impact screen is securely positioned and provides an optimal viewing experience.
- Attaching the Screen to the Frame: Begin by attaching the impact screen to the frame. Depending on the material you chose, you may use zip ties, bungee cords, or other fasteners to secure the screen to the frame. Make sure the screen is taut and free from wrinkles or folds.
- Positioning the Impact Screen: Determine the ideal placement for your impact screen within your golf simulator space. Consider factors such as distance from the hitting area, viewing angle, and available room. It’s important to position the impact screen at a height and distance that allows for clear visibility and proper ball tracking.
- Securing the Frame: Once the impact screen is in position, secure the frame to the walls or ceiling using appropriate hardware. This will provide stability and prevent any movement during use. Ensure that the frame is securely anchored to avoid any accidents or damage.
By carefully choosing the right material, building a sturdy frame, and properly installing the impact screen, you can create a budget-friendly solution that enhances your golf simulator experience. Now you’re ready to move on to the next steps in setting up your golf simulator.
Installing and Configuring Simulator Software
Setting up a golf simulator involves several key components, and one of the most important is the simulator software. This software is responsible for creating a virtual golfing experience, allowing you to play on famous courses from around the world without leaving the comfort of your own home. In this section, we will explore the steps involved in installing and configuring your simulator software.
Choosing the Right Software
When it comes to choosing the right software for your golf simulator, there are several factors to consider. First and foremost, you’ll want to ensure that the software is compatible with your simulator hardware. Different simulators may require specific software, so it’s important to do your research and choose one that is compatible with your .
Another important consideration is the features and functionality offered by the software. Some software packages may offer a wide range of features, such as multiplayer options, swing analysis tools, and customizable game settings. Think about what features are important to you and choose software that meets your specific needs.
Additionally, it’s worth considering the graphics and realism of the software. After all, a large part of the golf simulator experience is immersing yourself in a realistic virtual environment. Look for software that offers high-quality graphics and accurate physics simulations to enhance your gaming experience.
Setting Up the Software
Once you have chosen the right software for your golf simulator, it’s time to set it up. The process may vary depending on the software package you have selected, but here are some general steps to guide you through the process:
- Install the software: Start by downloading and installing the software onto your computer. Follow the instructions provided by the software manufacturer to complete the installation process.
- Connect your simulator hardware: Once the software is installed, you’ll need to connect your simulator hardware to your computer. This may involve plugging in USB cables, connecting wireless devices, or syncing your simulator with the software.
- Calibrate your simulator: Most software packages will require you to calibrate your simulator before you can start playing. This involves setting up the launch monitor and ensuring that it is properly aligned and calibrated. Follow the instructions provided by the software to calibrate your simulator accurately.
Configuring the Golf Course Options
One of the exciting features of simulator software is the ability to play on a wide variety of golf courses from around the world. Before you start your virtual round of golf, you may want to configure the golf course options to enhance your gameplay experience.
Many software packages offer a range of customization options, allowing you to adjust the difficulty level, weather conditions, and even course layouts. You can choose to play on famous championship courses, create your own custom courses, or challenge yourself with unique and challenging course designs.
To configure the golf course options, simply navigate to the settings or options menu within the software. From there, you can choose the desired course, adjust the difficulty settings, and even enable features such as wind direction and speed.
By taking the time to configure the golf course options, you can tailor your virtual golfing experience to your preferences and skill level. Whether you’re a beginner looking for a casual round of golf or an experienced player seeking a challenging course, the simulator software allows you to customize your gameplay to suit your needs.
Fine-Tuning Your Golf Simulator Experience
Fine-tuning your golf simulator experience is essential to ensure optimal performance and an immersive golfing experience. In this section, we will discuss three important aspects: adjusting the launch monitor settings, calibrating the projector display, and improving accuracy and realism. By paying attention to these details, you can elevate your golf simulator experience to a whole new level.
Adjusting the Launch Monitor Settings
The launch monitor is a crucial component of your golf simulator as it measures various parameters of your swing and ball flight. To get accurate data and improve your experience, you need to adjust the launch monitor settings properly.
First, make sure the launch monitor is positioned correctly. Follow the manufacturer’s guidelines for the ideal placement, which is usually a few feet behind you and slightly to the side. This placement ensures that the launch monitor captures accurate data without interfering with your swing.
Next, calibrate the launch monitor to your swing characteristics. This may involve inputting your club specifications and personal swing data into the software. By doing so, the launch monitor can provide you with precise feedback on your swing speed, launch angle, ball spin, and other important metrics.
Regularly check and update the software of your launch monitor to ensure compatibility with the latest advancements in golf simulation technology. This will enable you to access new features and improvements that can enhance your golfing experience.
Calibrating the Projector Display
The projector is responsible for displaying the golf course and other visual elements on the impact screen. Proper calibration of the projector display is crucial to ensure accurate representation of the golf course and an immersive experience.
Start by positioning the projector at the correct distance from the impact screen, as recommended by the manufacturer. This distance will vary depending on the specific projector model and screen size. Adjust the zoom and focus settings to achieve a clear and sharp image on the impact screen.
To enhance the realism of the visuals, adjust the brightness, contrast, and color settings of the projector. Experiment with these settings until you find a balance that accurately represents the colors and details of the golf course. Keep in mind that excessive brightness or contrast can lead to an unnatural and unrealistic visual experience.
Consider using a projector screen material specifically designed for golf simulators. These screens are designed to enhance the visibility and clarity of the projected image, ensuring a more immersive experience. Additionally, they often come with anti-glare properties, reducing the impact of ambient light on the display.
Improving Accuracy and Realism
To further enhance the accuracy and realism of your golf simulator experience, consider implementing the following tips:
- Optimize lighting conditions: Ensure that the lighting in your simulator room is adequate and evenly distributed. Avoid harsh shadows or bright spots that can affect your perception of the golf course. Experiment with different lighting setups to find the perfect balance.
- Fine-tune audio settings: Invest in a good quality sound system to replicate the sounds of a real golf course. The sound of the club striking the ball, the ambient sounds, and even the cheers of the crowd can greatly enhance the realism of your experience.
- Utilize software updates and add-ons: Stay up-to-date with the latest software updates for your simulator software. These updates often include improvements in graphics, physics, and overall performance. Additionally, explore add-ons or additional courses that you can purchase to expand your golfing options.
- Customize your golfing environment: Personalize your simulator space with golf-themed decorations, such as posters, flags, or even a mini-putting green. Creating a golf-centric atmosphere can help immerse yourself in the experience and make it feel more authentic.
Remember, the goal is to create a golf simulator experience that closely resembles playing on a real golf course. By fine-tuning the launch monitor settings, calibrating the projector display, and focusing on accuracy and realism, you can elevate your golf simulator experience and enjoy hours of virtual golfing fun.
Budget Golf Simulator Accessories
When it comes to setting up your budget golf simulator, there are a few that can greatly enhance your experience. From golf mat options to practice aids, these will take your simulator to the next level. Let’s take a closer look at each of these :
Golf Mat Options
A good golf mat is essential for practicing your swing indoors. It provides a realistic feel and helps protect your flooring from damage. There are several golf mat options available, each with its own advantages.
- Driving Range Mat: These mats are designed to mimic the feel of hitting off real grass. They often have a thick base to absorb the impact of your swing and provide a realistic feedback.
- Artificial Turf Mat: Artificial turf mats are a popular choice for budget simulators. They are durable, easy to clean, and provide a consistent surface for your shots. They are also more affordable compared to driving range mats.
- Gel Insert Mat: Gel insert mats are specifically designed to absorb the shock and vibration of your swing. They provide a softer feel and reduce the risk of injury. They are a great option if you have joint issues or want to practice for extended periods.
Simulator Turf
Simulator turf is another accessory that can greatly enhance your golf simulator . This specialized turf is designed to replicate the feel and performance of a real golf course. It provides a realistic surface for your shots and helps improve your overall experience.
- Durable Nylon Turf: Durable nylon turf is a popular choice for simulator setups. It is designed to withstand heavy use and provides a consistent playing surface. It is also easy to clean and maintain, making it a practical option for indoor use.
- Realistic Synthetic Turf: If you want to replicate the feel of playing on real grass, then realistic synthetic turf is the way to go. This turf is engineered to mimic the texture and performance of natural grass. It provides a more authentic playing experience and is a favorite among golf enthusiasts.
Practice Aids
To improve your golf skills and make the most of your simulator , consider investing in practice aids. These tools can help you work on specific aspects of your game and fine-tune your swing. Here are a few practice aids that are worth considering:
- Alignment Sticks: Alignment sticks are simple tools that help you align your body and club correctly. They can be used for various drills, such as improving your stance, swing path, and alignment. Alignment sticks are a versatile and affordable practice aid that can greatly benefit your game.
- Putting Mat: If you want to work on your putting skills, a putting mat is a must-have accessory. These mats provide a smooth and consistent surface for practicing your putting stroke. Some putting mats even come with built-in alignment guides and target holes to help you improve your accuracy.
- Swing Analyzer: A swing analyzer is a high-tech practice aid that tracks and analyzes your swing data. It provides valuable insights into your swing speed, club path, and other key metrics. By using a swing analyzer, you can identify areas for improvement and make adjustments to your swing technique.
Lighting Enhancements
Proper lighting is crucial for creating an immersive golf simulator experience. It not only enhances visibility but also adds to the overall ambiance. Consider these lighting enhancements to elevate your simulator :
- LED Strip Lights: LED strip lights are an easy and affordable way to add mood lighting to your simulator space. They can be installed along the walls or ceiling to create a soft glow. LED strip lights come in various colors, allowing you to customize the lighting to match your preference.
- Spotlights: Spotlights are ideal for illuminating specific areas of your simulator, such as the hitting area or putting green. They provide focused and bright light, ensuring that you have optimal visibility during your practice sessions.
- Dimmer Switches: Dimmer switches give you control over the brightness of your simulator lights. They allow you to adjust the lighting intensity based on your preference and the time of day. Dimmer switches are a practical addition that can enhance your overall experience.
In conclusion, these budget golf simulator are essential for creating an immersive and enjoyable indoor golf experience. Whether it’s choosing the right golf mat, investing in simulator turf, using practice aids to improve your skills, or adding lighting enhancements, these will take your simulator to the next level. So, why wait? Start building your dream golf simulator today and enjoy the convenience of practicing your swing anytime, regardless of the weather conditions.